Changing the wick of kerosene heaters can be easy if you have the perfect tools. Kerosene heaters are divided into various sections. The wick section is at the bottom of the heaters. Therefore, to reach there you will require some tools, and here is the list of tools that you should have.
Materials Required
- A pair of Gloves.
- Some Screwdrivers.
Warning
- Ensure that the heater is completely cool before you start.
- Take proper precautions to avoid any situation of danger.
15 Easy steps to change the wick of a Kerosene Heater
Step 1: Go through the manual
As always said, many heaters are available in the market. Therefore, it is necessary to understand which type of kerosene heaters you owe. Henceforth, go through the manual to know more about the kerosene heater.
Step 2: Ensure the wick is lowered
Trigger the safety shutoff device to lower the wick. So, it would be easier to pull it off.
Step 3: Remove Screws
Unscrew the screws from the base of the heaters and take off the cabinet.
Step 4: Remove batteries
Most of the heaters may have batteries while in some there are no batteries. So, if your heater does have the batteries then take them out.
Step 5: Remove the battery case
Disconnect the battery wires and then remove the screws to remove the battery case.
Step 6: Remove the fuel cap
Take off the fuel cap and remove the adjusting knob from the base.
Step 7: Remove the base
Remove the base by loosening the screw and put the knob back.
Step 8: Remove the wind cover
Step 9: Remove the four wing nuts
Unscrew the wing nuts and lift the wick adjuster assembly gasket.
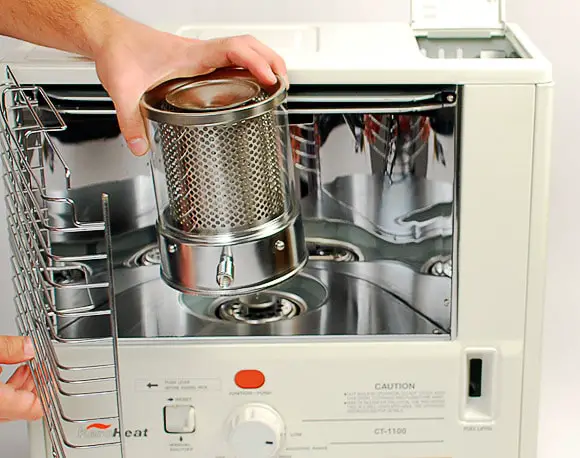
Step 10: Turn the wick cover and open it
Fold from the center to remove the wick from its teeth.
Step 11: Insert the wick
Press the wick into the teeth to stick it firmly. Turn the knob to raise the wick upwards
Step 12: Install the cover back
Place the wick cover and place it on the assembly gasket. Make sure there is no slack.
Step 13: Install the four wing nuts
Test the wick by turning the knob clockwise to raise it up and then press the safety value to check the motion. If it’s correct keep going. But, if it does not function well then stop and fix the issue.
Step 14: Reinstall the wing cover
Remove the knob and install base. Insert knob and fuel cap. Connect wires with the battery case. And secure them with screws. Install the batteries.
Step 15: Install the cabinet base and secure them with the screws
Your wick is successfully changed. Now, before you use just let it rest for some hours in the kerosene tank to let it absorb kerosene completely. And you are ready to use it again.
Wrap up
So, following the steps correctly will help you fix the wick easily. Don’t bother much, it’s not that tough a task to implement. But make sure that you are very careful. Please take all the preventive measures to avoid any circumstance. Also, work when the heaters get completely cool. Keeping note of small points will let you function well and you can change the wick easily.

I am Richard A. Jackson man behind propane heating solution, An HVAC expert working as a team lead of the heating department, Provide services all over the USA (around all major cities), and from planning to implementation, you will get all your solution here. We provide various tanks (propane and other natural gases) and deal with disposable waste.